
Microsoft Corporation that allows working on many applications like Excel, OneNote, Outlook, SharePoint, etc. in a single platform over cloud develops MS Office 365. The software built with an idea of providing numerous innovative features and more comfort ability to Exchange Online users’. It not only provides great functionalities but also higher accessibility. In this blog, I am going to discuss the several methods and steps for PST to Office 365 migration to upload the Outlook PST file to o365 accounts. Before that let me tell you some of the points people are choosing Office 365 over MS Outlook.
Reasons to import PST file in Office 365 webmail.
Both Outlook and Exchange Online are build-ups by Microsoft still there are many reasons nowadays many organizations’ are moving their Outlook data files to Office 365. The following are some of the significant reasons to choose Office 365:
- Being a Cloud environment offers high security to its data.
- Facility to store a large amount of data to its Cloud Platform.
- Collection of many various applications on a single place.
- Offers low maintenance cost and are less prone to server downtime problem.
- With a more efficient and effective feature provides higher accessibility.
- Designfor all Windows, MAC and Android Operating System.
These are only a few features of Office 365. Being cloud-based every day, you find something new provided by Microsoft that not only makes your work easier but also makes it effective.
How to move the local PST file to Office 365?
The first method is the Network Upload Method, the manual process of exporting PST data to Office 365 accounts. Second is the Third-Party solution, which allows PST file data conversion with the help of the software.
Method 1: How to import PST to Exchange Online mailbox
Step 1: Assigning the Import/Export role to the Office 365 user account.
In Admin Exchange Centre, you need to assign the Import/Export permission to users’ mailbox. For that first, you need to create the Mailbox Import Export role under Admin and add members to whom you want to assign this role.
Step 2: Importing of a new job:
Login to Exchange online account–>Admin Center–>Security and compliance–>Data governance–>Import. Click on the Import new job then type job name and next. Now, choose the option between- upload your data or ship hard drive data. So just,select upload your dataànext.
Step 3: Download the Microsoft Azure AzCopy Tool and copy the SAS URL
You need to download and install the AzCopy Tool. This tool is required to run the command. Copy the SAS URL provided by the o365 as the destination link.
Step 4: ImportOutlook PST file using the AzCopy Tool
Run the tool as an administrator and execute the given command.
AzCopy.exe /Source: network path /Dest:” SAS URL” /V: give a location where you want to save log file \AzCopy.log /Y
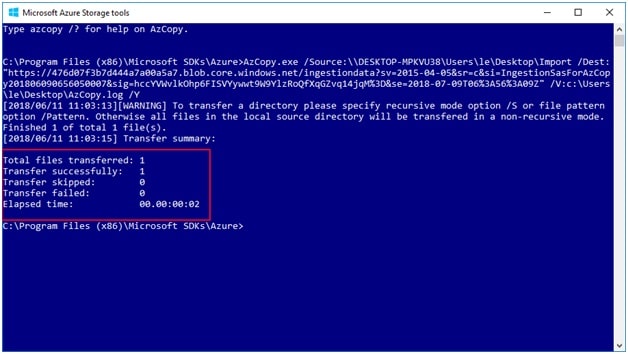
Transfer the PST file to Office 365 using this tool where you require giving the PST file path or the network path, SAS URL and the destination location.
Step 5: Mapping and verifying of PST file
To map a file you require making a CSV file in the given format and you have to save it in .csv format. Then, you need to browse that file, validate it and save. Below is the format of the CSV file:

Method 2: How to add a PST file to Office 365 account using the software.
The software provides a quick and smart way of transferring data.
Step 1: First, download MailsDaddy PST to Office 365 Migration Tool. After installing, open the software.
Step 2: Open the tool. Click on the Add file. A dialog box will appear. Browse Outlook PST file. Click on Scan–>OK.
Step 3: Click on Export. Choose the option either Export all folders or Export selected folders.Choose an export option-Export to the primary mailbox or export it to the archive mailbox. Browse the location to create a log file. Click Next. Type the Admin ID or Password. As you type it and click OK, the conversion process takes place.
Step 4: For bulk export, you need to make a CSV file in excel with PST file path, user ID and Password and save it to .csv format. Click on the Bulk Export option. Browse the CSV file. Choose the export option and the destination for saving the log file to a particular location. Click Next. Type the Admin ID and Password and hit OK. Then the conversion process takes place.
What are the benefits of using a PST to Office 365 conversion tool?
- You can use the software and perform single, bulk, and Impersonate migration from PST to Office 365. Offers Exporting of PST file to Office 365 Online Archive or Primary mailbox with all its messages, calendar, notes, appointments, etc.
- Helps in organizing the PST data in a defined folder of a particular Exchange Online mailbox.
- Retains Outlook PST file structure even after PST data conversion to Office 365 environment. Keeps the HTML formatting and the Meta information preserved.
- Involves features such as date filter, several PST file search options, the saving of log file, etc.
- Windows-based application to run on all versions of Win Operating System including 10, 8.1, 8, 7, XP, Vista, Professional, 2000, and all other old editions.
Conclusion: Through this blog, I discuss the important features of MS Office 365 and talk about how to do PST to Office 365 migration procedure for migrating Outlook PST files to Exchange Online Cloud mailboxes.